Creating Correlation Scenarios: Blocking TCP Port Scanners
Threat Defender uses behavior-based correlation to analyze traffic and correlate events across multiple traffic flows.
The following example shows how to set up a correlation scenario with Threat Defender that contains an event tracking table (ETT), a dynamic network object (DNO) and rules.
For further information on the various setting options of correlation scenarios, refer to Advanced Correlation.
Tip
Threat Defender provides several preset correlation scenarios that you can enable and adapt to suit your network and requirements. You will find the Port scan protection scenario under Policy > Advanced Correlation.
Objective
With this example setup, Threat Defender detects and blocks port scanners by dropping their connection attempts.
Attackers use port scans to detect vulnerable services in the network. By interrupting such a scan, an attack can be stopped in its first stage. Port scan attacks can be identified by a large number of connections to different TCP ports established by the same client IP. Normally, clients only connect to a small set of different server ports.
Using the Threat Defender correlation engine, you can track the destination ports of all traffic flows per client. If clients initiate more than 100 TCP connections to different ports within one minute, this behavior is classified as a port scan. To stop the port scan, traffic from these clients is dropped.
Creating an Advanced Correlation Scenario
First, create a correlation scenario that provides the framework for the required event tracking table, dynamic network object and rule set.
In the GUI, navigate to Policy > Advanced Correlation.
Click Add to create a new scenario.
Enter a Name and an optional Note.
Click SAVE.
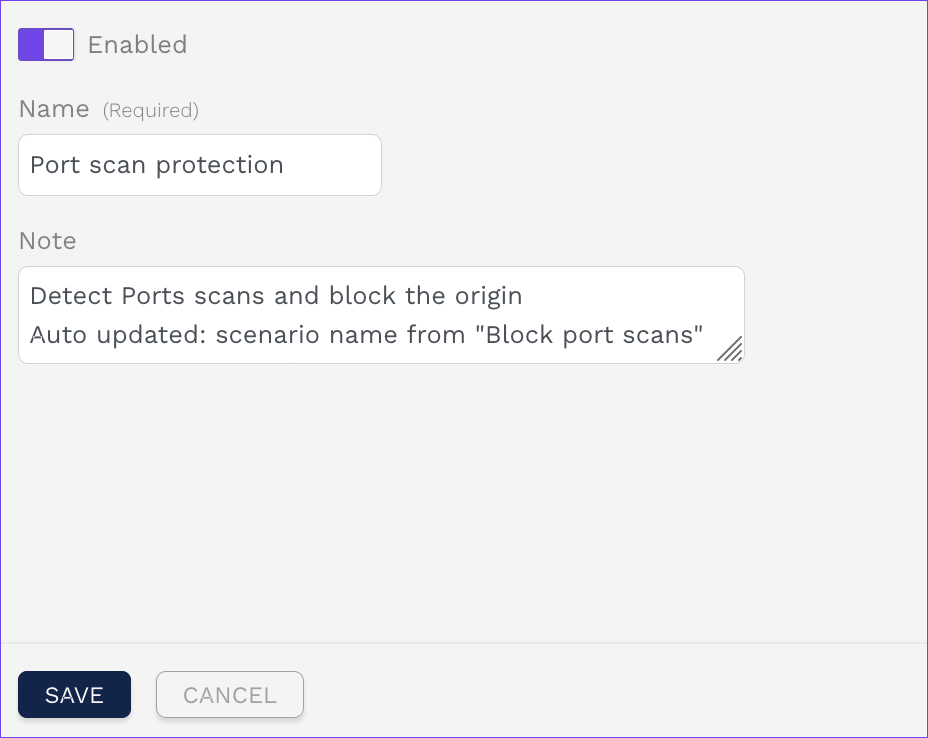
Basic settings of the advanced correlation scenario.
Creating an Event Tracking Table
Create an event tracking table that stores the number of contacted destination ports per source IP address.
In the scenario, open the Event Tracking Tables tab.
Click Add.
Assign a Name to the table, e.g.
Ports per host.Configure the following settings:
Set the Retention Time for Event Tracking to
300in order to track all connections within a 300 second window.Set the Primary Attribute Type to
IP Address.Set the Maximum Number of Primary Attributes to
1000.Set the Secondary Attribute Type to
Layer 4 port.Set the Maximum Number of Secondary Attributes per Primary One to
101.
Click SAVE.
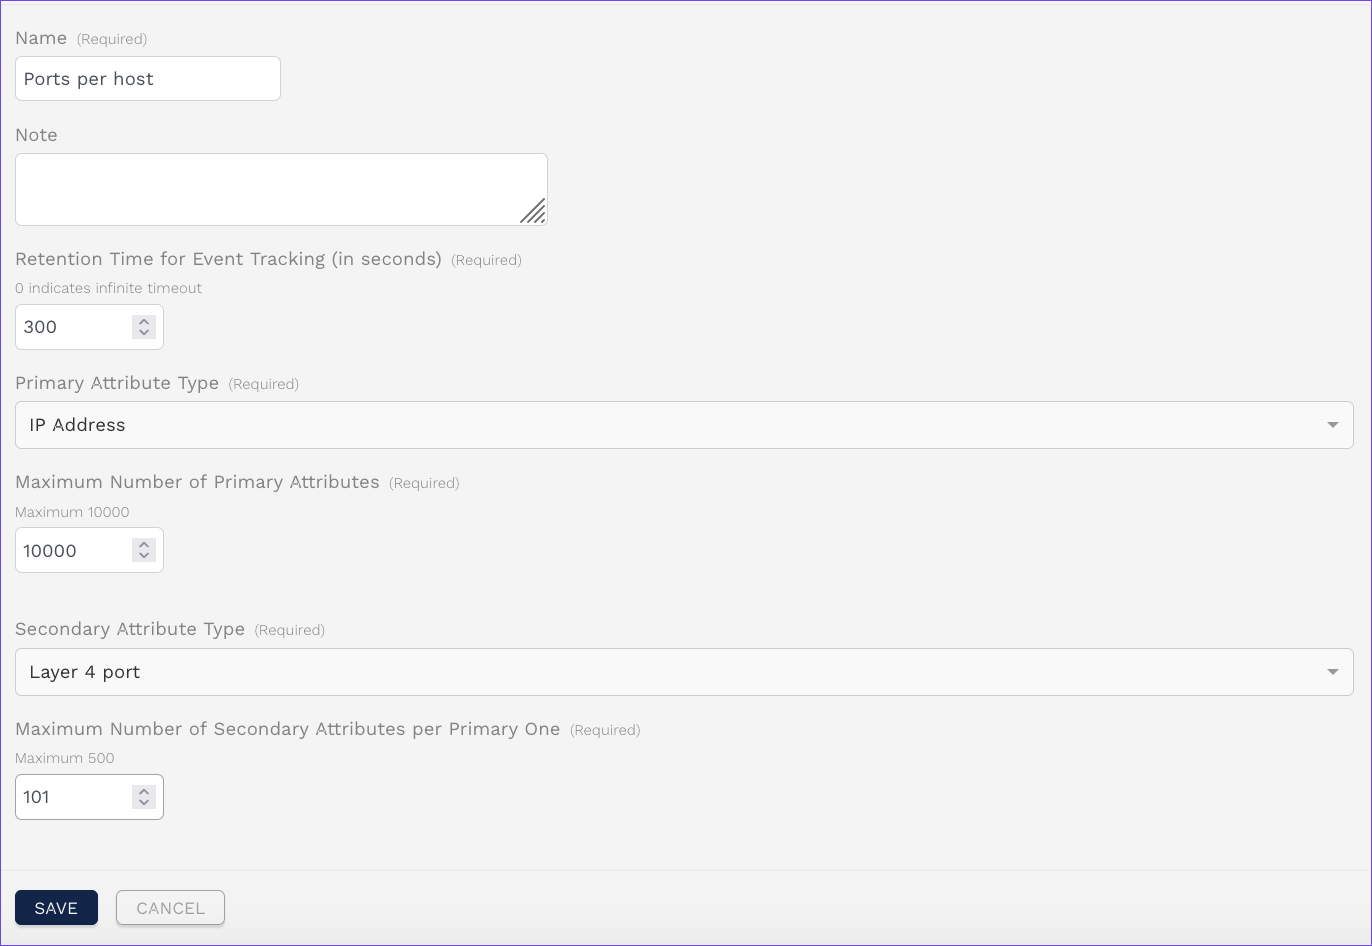
Configuration of the event tracking table.
This event tracking table tracks a maximum of 1000 IP addresses with 101 ports each. That means, the data structure may contain up to 101000 entries in total.
Creating a Dynamic Network Object
Create a dynamic network object in the advanced correlation scenario. It collects the IP addresses of all hosts that have more than 100 port entries in the event tracking table, i.e. contact more than 100 ports per minute.
In the correlation scenario, open the Dynamic Network Objects tab.
Click Add.
Assign a Name, e.g.
Port scanner hosts.Configure the following settings:
Under Network, select External.
Set the Size to
100.Set the Timeout to
300.
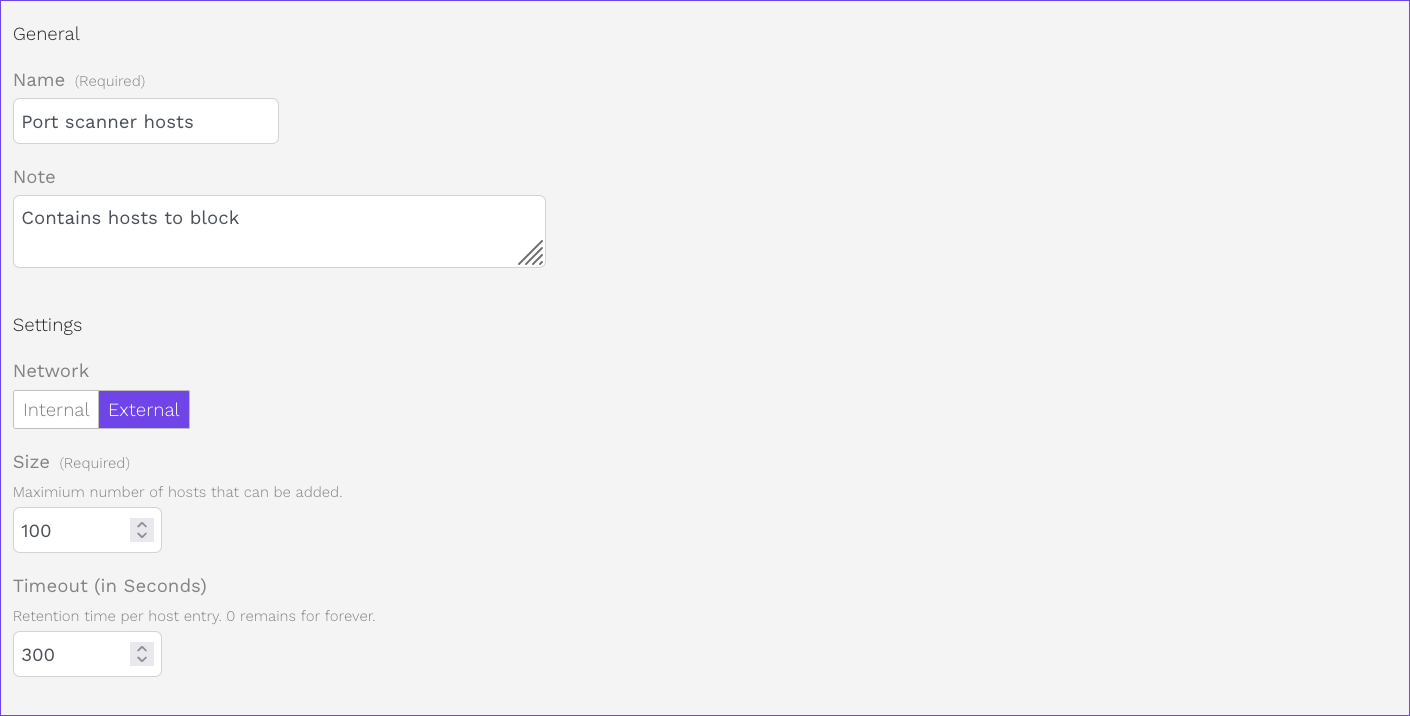
Configuration of the dynamic network object.
Click SAVE to store the dynamic network object.
Creating Rules in a Correlation Scenario
To evaluate the traffic, the following three rules are needed in this correlation scenario:
Rule 1 enters the source IP/destination port combinations of all clients in TCP connections into the event tracking table.
Rule 2 counts the port entries stored in the event tracking table for each client IP. If a client IP has more than 100 port entries, i.e. connections to ports, it is added to the dynamic network object.
Rule 3 silently drops the traffic from IPs stored in the dynamic network object.
To set up a rule in the correlation scenario, proceed as follows:
In the correlation scenario, open the Rules tab.
Click Add to create a new rule for the scenario.
Assign a Name.
Optional: Add a Note.
Configure the following settings:
In the Source & Destination section, set Source Networks and Destination Networks to
Any.In the Conditions section:
Enable Layer 4 Protocol by clicking the slider switch.
Enter
Transmission Control (6 TCP)into the input field.

Filter traffic by layer 4 protocol.
In the Actions section:
Enable Add to Event Tracking Table by clicking the slider switch. This action is only available for rules that belong to correlation scenarios.
Under Event Tracking Table, select the event tracking table created in this scenario.
Under Primary Attribute of Event, select
Client Address.Under Secondary Attribute of Event, select
Server Layer 4 port.

Track traffic attributes in the ETT.
Click SAVE to store this rule.
Create the remaining two rules in a similar fashion.
The following table shows the required settings for all three rules:
Rule |
Source |
Destination |
Condition |
Actions |
|---|---|---|---|---|
|
|
Layer 4 Protocol Protocols: |
Add to Event Tracking Table |
|
|
|
Advanced Correlation Condition: |
Dynamic Network Object Operation: |
|
|
|
Log: |
Click the APPLY CHANGES button at the top of the menu bar to activate your configuration changes.
Result
Traffic from all hosts that establish 100 or more TCP connections to different ports per minute is dropped for 5 minutes. Port scans performed by these hosts are stopped. When the timeout expires, the hosts are automatically removed from the dynamic network object and may establish new connections with the network.

Rule set of the correlation scenario.
Additional References:
For further information on the settings options for correlation scenarios, see Advanced Correlation.
For further information on the settings options for event tracking tables, see Event Tracking Tables.
For further information on the settings options for dynamic network objects, see Dynamic Network Objects.
For further information on the settings options for rules, see Rules.